Here's what I did. I made a 16 thread tablet woven starting border. I made 144 warp threads. I cut one end of the warp thread loops to create 72 long threads. I took my needle and threaded each warp thread into the band individually. I sewed this long strip of warp threads onto my loom beam, then carefully separated the warps into front and back threads. 72 in the front, 72 in the back. I tied a loomweight to each bundle, resulting in two loomweights with 72 threads each.
The actual weaving process for the Stage 1 pre-experiment went very smoothly. The sample was about 6cm wide and about a meter long. And it looked like a linen seat belt. Lol. Maybe that idea is worth exploring later when the automobile industry looks into more sustainable construction materials for their electric cars... I used a wooden weaving sword to push the weft into place, but archaeologically, there is no evidence for this at my case study sites. How did an Iron Age weaver push the weft into place? Is a tool even needed? Can an iron/bronze weaving sword do the job? Again, it's something to consider with future research because in this case, it does impact the cloth I was making.
I finished the strip after a week of weaving 'in my spare time', cut it off the loom, and marveled at what I did. Here are some thoughts I had:
I'm sure by now that you probably want more details about the experiment. I'm writing up the parameters of my experiment and the reasons why in more detail, along with the insights this experiment garnered, to be put into a publishable format for a journal (still deciding where to send it). So many nuanced decisions were made during this process and it does convey the complexity involved in textile production--no surprise there, but it does make it difficult to maintain transparency in my methods without having to write an entire book that describes my reasoning to the fullest extent possible.
I have presented a 'lite' version of this experiment (Stage 2, actually) while I was in Edinburgh at the end of October and got some great feedback, including positive words from Susanna Harris (who helped examine the Must Farm textiles). I've also submitted an abstract to a student conference for experimental archaeology scheduled for March 2020 in Sheffield. I'm hoping that with all the feedback from these sources, I'll get the paper written and submitted to a journal by summer next year. I'm thinking of EXARC as my first choice, but I'm open to other options too.
That itself is another point to make. Publishing the results of experimental work in academia can be very time consuming as well. It could be a full year or so from the time I started the experiment until it is published, if I'm lucky. And here I am publishing some of the details on my blog inside of two months. Also, some of you may recall that I have talked about loomweights and warp-weighted experiments in the past. I did! I have a blog (Part 0, Part 1, Part 2, Part 3, Part 4, Part 5) and video post about it as well. Check those out to see how far I have come with my research and experimental pursuits. I say some wrong things but getting access to academic material was very hard for me in those days.
I'll post more updates about the progress of this project as I make new videos and write up more about the Stage 2 of the experiments. Let me know what you guys thought about this content and whether you thought it was too long/short, too detailed/too vague. Thanks for reading!
This was a clunky solution to the problem. I had to deal with an issue I hadn't considered, but now that it was a potential problem I needed to think about for the Stage 2 of the experiment, I had a chance to form a contingency plan for it. The important point here is that I still managed to arrive at the proper setup I required and everything was ready for heddling and weaving.
Here's where experimental archaeology in academia is very tedious and tiring. If this parameter had been an essential variable, I would not be able to devise such a solution. If I was working with a scrap of textile that had this warp density and a tablet woven starting band, I would not be justified in 'faking' it. As it stands for this experiment, however, it gave me an excellent question to ask senior textile studies researchers what they thought but didn't otherwise impede my progress or time tabling.
The actual weaving process for the Stage 1 pre-experiment went very smoothly. The sample was about 6cm wide and about a meter long. And it looked like a linen seat belt. Lol. Maybe that idea is worth exploring later when the automobile industry looks into more sustainable construction materials for their electric cars... I used a wooden weaving sword to push the weft into place, but archaeologically, there is no evidence for this at my case study sites. How did an Iron Age weaver push the weft into place? Is a tool even needed? Can an iron/bronze weaving sword do the job? Again, it's something to consider with future research because in this case, it does impact the cloth I was making.
I finished the strip after a week of weaving 'in my spare time', cut it off the loom, and marveled at what I did. Here are some thoughts I had:
- Is the heaviness of a loomweight important to consider by itself, or is it more important to consider how mass is distributed across the thickness more important? At the start of this experiment, it was generally understood that heavy loomweights = coarse fabrics, but a 0.7mm thread is about a fingering weight yarn.
- If you can weave with heavy loomweights and linen threads, what happens if you use wool? Wool, as many of you know, is far more elastic than linen.
- What is the upper bound of tension that a linen thread can handle which considers its gauge. In other words, how much tension can a 0.7mm linen single handle before it breaks?
- How might people have use this very dense cloth? It turned out warp faced, but is that a desirable outcome for an Iron Age population?
And I had more thoughts afterwards too, but these were the ones that seemed most interesting to pursue for now. Because the Stage 1 experiment did what it needed to do to convince me that I had worked out the potential bugs, I could do some creative things with the finished piece. I washed some pieces and left others unwashed. I experimented with different hemming principles and finishing techniques. Here are those results:
 |
| This is the finished piece that was folded on itself to show how rigid and dense the cloth was. |
 |
| Here is a close up of the finished weaving to illustrate how dense the warps are. You can barely see the wefts! |
 |
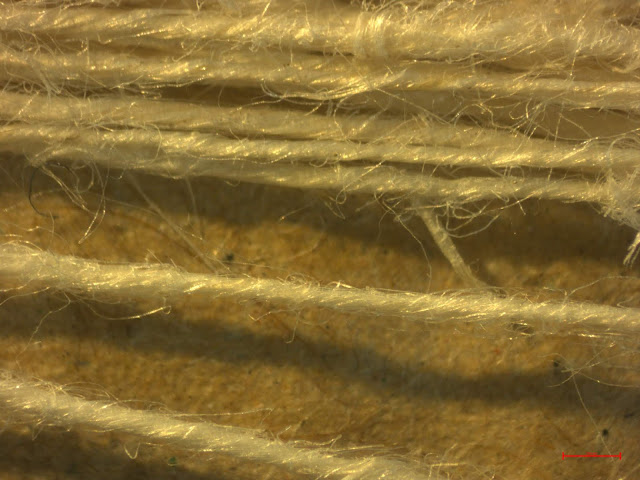
| This is a steromicroscopic image (apologies for the quality) of one woven sample that was washed. Note how the yarns have flattened out slightly |
 |
| This is another steromicroscopic image of the sample where I smoothed the surface with a polished stone. It is more flattened than the above washed sample and the resulting fabric is very soft to the touch. |
 |
| On this sample, I smeared a stick of beeswax over the surface after the cloth was washed. I thought about how someone might try to waterproof a cloth after it was woven. This is one way to do that, another way might be to dip the cloth in hot beeswax and allow it to dry flat. Anyway, it has a very strange surface, like touching a candle! |
I'm sure by now that you probably want more details about the experiment. I'm writing up the parameters of my experiment and the reasons why in more detail, along with the insights this experiment garnered, to be put into a publishable format for a journal (still deciding where to send it). So many nuanced decisions were made during this process and it does convey the complexity involved in textile production--no surprise there, but it does make it difficult to maintain transparency in my methods without having to write an entire book that describes my reasoning to the fullest extent possible.
I have presented a 'lite' version of this experiment (Stage 2, actually) while I was in Edinburgh at the end of October and got some great feedback, including positive words from Susanna Harris (who helped examine the Must Farm textiles). I've also submitted an abstract to a student conference for experimental archaeology scheduled for March 2020 in Sheffield. I'm hoping that with all the feedback from these sources, I'll get the paper written and submitted to a journal by summer next year. I'm thinking of EXARC as my first choice, but I'm open to other options too.
That itself is another point to make. Publishing the results of experimental work in academia can be very time consuming as well. It could be a full year or so from the time I started the experiment until it is published, if I'm lucky. And here I am publishing some of the details on my blog inside of two months. Also, some of you may recall that I have talked about loomweights and warp-weighted experiments in the past. I did! I have a blog (Part 0, Part 1, Part 2, Part 3, Part 4, Part 5) and video post about it as well. Check those out to see how far I have come with my research and experimental pursuits. I say some wrong things but getting access to academic material was very hard for me in those days.
I'll post more updates about the progress of this project as I make new videos and write up more about the Stage 2 of the experiments. Let me know what you guys thought about this content and whether you thought it was too long/short, too detailed/too vague. Thanks for reading!