Sunday, March 29, 2015

What to Do With Less Than Stellar Mohair?

This probably happens to most of us. We buy a fleece, part or whole, online or in person, get it home, then really look at it. And sometimes, we think it just needs a good washing and it'll be better. In the back of our minds, there is a niggle of doubt. So, let me tell you a short story about how this mohair came into my possession.

A billion years ago, on ravelry and facebook, I read from Namaste Farms that 'dandruff' in mohair was actually lice, not skin flakes. Of course, neither of those is acceptable in a fleece, but one is worse than the other--lice will eat the fiber and weaken it. When I set out to buy mohair again, I decided to buy samples from specific animals to double check their fleece for lice, then when none was present, I planned to buy a pound or more of that specific animal's fleece. Great idea in theory, but doesn't always work in real life. So, I had 3 samples, all of which were fantastic, then I bought a pound of apricot locks and realized that it was quite dirty. At the time, I thought it was mostly vm...but that vm wasn't alone.

After rediscovering this mohair at Christmas, I washed the locks to remove more dirt and vm and...lice. Then I picked open the locks and washed it all again. And doing my best whenever I can to shake the debris out of the locks. Even after the spinning, there is still enough leftover for you to notice it in the finished yarn.


It could be that this shepherd didn't realize what was sent to me, because I doubt that a shepherd who caters to handspinners would last long in the fiber world if vm/lice fiber was sent out each time. I will assume that this was an anomaly, because I like to give people the benefit of the doubt. Most people aren't outright mean or scammers.


It looks like a wonderful, super soft and squishy yarn, right? Well, it is. Except for when you bring the yarn up to your nose--mostly, you'll notice that it is still inundated with tiny bits of vm. When I encountered a random cluster of lice eggs, I threw those locks into the trash. I know, into the trash. I like to save and reuse and reinvent fiber everywhere I can, but not this time. By doing that, I at least was able to save most of the rest of the locks, covered in vm as it were.


There are some darker bits of vm that you might be able to see in the picture below. There was a lot of things happening to this poor goat's fleece. Within some of the heavy vm tangled locks, which were also thrown away, I found true skin flakes, large and yellowish-white, which looked like the animal had scratched at the lice until he/she bled, then the skin scabbed over.


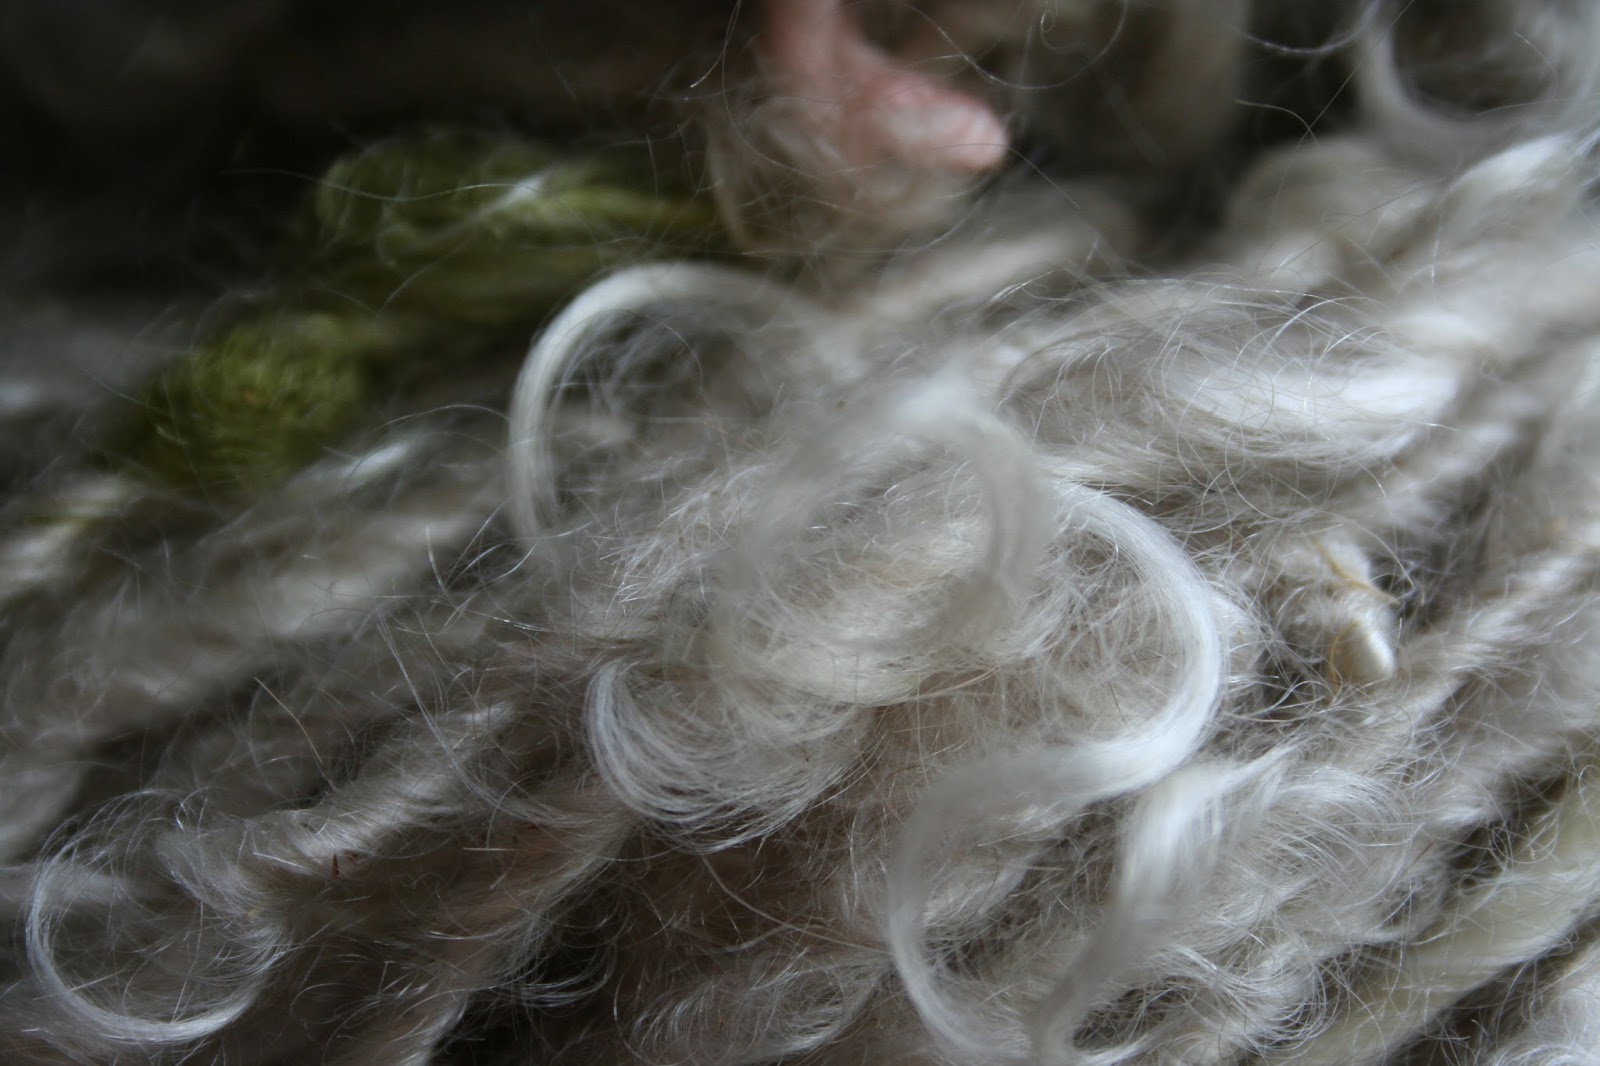
Aside from the lice, scabs, and copious amounts of vegetable matter, the mohair is extremely soft. That makes me thing that the animal had the appropriate diet for growing his/her fleece, but since I do not personally raise goats, I can't tell you for certain. So, after all of the washing and shaking and picking and spinning and washing and shaking, the finished yarn contains only about 10-20% of the original amount of gross things. What am I going to do with it? By now, you're probably a tad grossed out, and I am a little bit too.

With the mostly clean yarn, I plan to make a soft rug for Mr. IT Guy's feet when he's busy working at his computer. The floor under the linoleum in our apartment is just concrete, so it hurts your feet if you've been sitting for a while (even if he gets up and walks around for get the blood flow back into his legs, sitting with your barefeet on hard concrete all day can be painful). Mohair spun by the lock doesn't hold up well as a warp yarn, so I chose my remaining Lincoln locks for making a strong, 2-ply warp yarn.


Do you see that little halo of fiber around this skein? I spun the Lincoln from the lock, mostly worsted but occasionally from the fold. Lincoln doesn't flex and bend in the same way merino does, because it's coarser, so the bent locks poof out of the yarn into a halo like this. I did this for two reasons: 1) I wanted to just get it spun quickly, so I didn't worry about the preparation as much; and 2) I wanted to give the mohair something to latch onto when I did the final washing stage.


Here is my Kromski Harp loom all ready to go:


I wove the first two inches with the leftover Lincoln yarn. I plan to tuck the ends under the rug so there isn't any fringe. Since the Lincoln is the thinner of the two yarns, I wove the ends with that so the finished rug won't be so bumpy.


It'll be a quick weaving project. Big yarns are like that. I love how the Lincoln is turning out...kind of makes me want to make a future rug with it! Although this was not the intended use of my mohair, I'm glad I didn't throw it all away. I will only buy mohair in person from now on, and I will not buy any when I can't inspect with my eyes, hands, and nose. Buying mohair can be tricky for new spinners, so if you're planning to buy some, double check with a trusted expert first. My pick from now on? Namaste Farms

Tuesday, March 24, 2015

Let's Wash a Merino Fleece: Step 3, Mesh Washing

Okay, so you have divided up your merino fleece, very carefully. Now, I prefer to wash in a mesh bag because it helps preserve the lock integrity. You can certainly wrap up the wool in some muslin and place it in the mesh bag to further preserve the lock structure, but it will take longer. I suggest doing this if you have the time, since it's completely worth the effort (+Kim Degener mentioned that she pulls out the individual locks, wraps it in some cloth, then washes it in Orvus paste). The end result will still maintain the lock so you can pull them out and spin them quickly and easily.

Before I wash the seconds, I do a small (super tiny, maybe 10 grams) test to get an idea of the number of washes I will need to do. It also lets me know how effective the soap is that I'm using. This isn't a necessary step, but it's a great one for beginners. It's a baby step. Sometimes we need those.


Now that I've tested the fleece, I think I'm probably going to need 3 washes to the lanolin mostly removed. (This was some organic brand I've never used before--the professional washing agent I used before might have done a better job.) I don't want my merino to feel gummy. Place your fleece into the mesh bag in an organized fashion. I make sure all of the points of the fleece are sticking up:


Be sure to push the ends of the fleece patch into the very bottom of the mesh bag so you can maximize how you use the interior space. You really want your fleece to have breathing room in the bag, so don't over fill it.


Now that it's full, I've pulled the drawstrings closed. It looks puffy, but that's only because the locks are standing straight up:


You can see here that it's only 1 lock high:


If you are washing a fleece with less grease than a fine wool fleece, you can start by doing the cold soak method, which loosens and removes dirt. I have found that fleeces with lots of lanolin, they tend to float rather than soak with the cold soak method. If your particular merino fleece is dirty (perhaps it was uncoated and thus dirtier), you might want to fill small water bottles with plain water and place over the mesh bag so it can soak.

If you plan to scour your fleece, select your soap and wash basin. I'm using a laundry/work sink and some un-scented, dye-free laundry soap. Fill the tub/sink full enough so that: 1) the water will retain its heat; and 2) there is space between the fleece and the dirt which will settle to the bottom.

I let it soak on one side for about 10 minutes, then gently flipped the whole bag over (do this slowly rather than quickly so you don't rustle the locks too much) and let it sit for an additional 5-10 minutes. When it's ready to remove, I fold the bag gently in half, lift the whole bundle straight up out of the water, then drain the tub and let the bag hang over the faucet to drip for a minute. DON'T SQUEEZE!

Refill, wash, place bag, 10 mins, flip, 5-10 mins, fold bag, lift, drain. Repeat. Then comes the rinsing. Do everything you did for the washing, except don't add in the soap. Be sure that you remove ALL of the remaining soap from the fleece. I did two plain water rinses, then I added 1/2 cup of vinegar to the final rinse to make sure I neutralized any remaining soap residue. The pH of soap is damaging to wool fibers, so it's important to remove as much of it as possible. Additionally, the acidity of vinegar is similar in pH to that of the wool, so it's fine if you just eyeball that 1/2 cup.

After the final rinse, let the wool hang in the bag until it stops dripping and cools slightly. Don't handle a hot wet fleece too much, and try not to squeeze it much. If you must squeeze, do it gently.

Lay it out on a screen if you have one, or lay it out on a large towel and roll it up. I let the towel absorb the moisture without additional squeezing. Lay out the fleece on a clean, dry towel and let it air dry.


The locks will be loose and wobbly, but they get their spring back when they're fully dry. I flip the whole thing over about every 6-8 hours so I can get even drying. This is when a drying screen comes in handy (no flipping needed)! Continue this washing and drying process with the rest of your fleece. I'll be back in the next installment to share some tips and details about storing your washed fiber. Are you feeling a bit less nervous about washing your first fleece? I hope so! But if you still have questions or you want further clarification with a specific breed of sheep, let me know. Ask me at expertlydyed@zoho.com, or share them on Facebook. Good Luck!


Monday, March 16, 2015

Fleece to Shrug: Spinning and Plying the Yarn

Your batts have probably been finished for a while, or maybe you spun it. I meant to post these photos last year in September and October, but I suppose I got wrapped up in other things! (I remember that I was weaving that epic table runner--which has to be fixed, by the way!). No matter how you decide to spin your batts, or whether you want to ply the singles, you should probably have around 200 yards of bulky weight yarn. This will be enough to swatch before you begin, if you want to, though gauge doesn't matter too much.

You can also use a different gauge of yarn, though it will alter a few things in the pattern. I'll show you how to do that in a later post (probably when the project is all done so I don't confuse people), but if you want a quick reference for how to size the pattern for a thicker or thinner yarn, check out my NEW Ravelry group (and join if you haven't already), specifically this thread.

Here's what I did to make this yarn:


I knew I wanted to make a 2-ply yarn, so I looked at the pattern which calls for a 6-8 WPI finished yarn. Merino poofs up slightly when it is washed, so I decided to spin a 16 WPI single for all of my batts. With the poofiness, I figured that my finished yarn would fall somewhere in the 6-8 WPI range.

I didn't want to smash any of the lumps and bumps in my yarn, so my singles look a little bumpy. They'll poof up when it is plied. Beginner yarn looks very similar, and it is with much practice that I have managed to make my yarns look like beginner ones again!


After it was spun, I took a sample to ply it on itself to check for balance, but also to make sure that when I plied it in the future, it would be plied correctly. If you're plying for the first time, don't worry if it is over or under plied when the yarn has been washed--you can always fix that by reattaching it to your spindle or wheel and either letting out some twist or adding in some extra twist. Rewash your yarn to check for balance.

I sat down and plied the yarns all in one go, and I got two full bobbins:


You can really see how the additions have created interesting visual contrast with the cranberry base I used. The little nubby bits from the merino also add some visual texture to this yarn. From a distance, this yarn will look mostly cranberry pink, but as you get closer, you'll see the little pops of yellow.


I also created a playlist over on YouTube for those following along with this project series. Check there for additional information about the spinning and plying phases. I can't really do upclose videos as well as I can do upclose photos.

And when you're all done plying (or just making the singles), you'll need to skein up the yarn and set the twist is warm soapy water. I will also post the two skeining videos below:


I know this is a lot at once, but I suspect that many of you following along with this project will either have made the yarn already, or you have some yarn in your stash! If not, you still have time to get some yarn whipped up. I'll be working on this project for the next few weeks, and I'll post regular progress on Ravelry. Let's do this Spin-Along/Knit-Along together!

Thursday, March 12, 2015

Making Bread: Pretzel Buns

Break out the dough hook! Or just a really good kneading board. So many of you demanded this pretzel bun recipe, so I'm posting it here so you can all get access to it. I'll have the measurements in both grams and cups to accommodate bakers all over the world. And if you're new to making bread, checkout youtube for some videos regarding the step in question. Making bread is easy, once you get the hang of it. :)


Pretzel Buns:

1.5 cups warm water (353g) (water should be slightly warmer than body temperature)
2 tablespoons light brown sugar, packed
1 package active dry yeast (2.25 teaspoons, 8g)
3 ounces unsalted butter, melted (6 tablespoons, 85g)
2.25 teaspoons salt (8g)
4.5-5 cups all purpose flour (or, 20/80 whole wheat/AP) (562g-625g)
oil for coating

Boiling liquid:

3 quarts of water (just be sure to use a large dutch oven which is about half full)
3/4 cup baking soda (231g)

Brushing liquid:

1 whole egg, beaten with 1 tablespoon cold water
coarse sea salt, optional

Pans:

2 baking pans, lined with parchment paper

Combine sugar, water, and yeast in a large bowl. Proof the yeast by allowing it to dissolve. After 10 minutes or so, it should be bubbly and smell yeasty. Add in melted butter and stir. Make sure that the butter isn't hotter than your warm water. Let rest for 5 minutes. Add in flour and salt. Mix until combined. If you're using a version with whole wheat, let the mixture sit for 5-10 minutes. This allows the whole wheat extra time to absorb the water.

Begin kneading until smooth and elastic. Use extra flour where necessary. The dough will be soft to medium firm when finished. Versions with whole wheat will be slightly firmer. Place in an oiled bowl and cover. Place in a warm, draft-free place. I place mine in the oven with the light on. Allow 1 hour for it to double in size.

Preheat the oven to 425F (about 220C). In a large pot or dutch oven, combine the water and baking soda. Stir. Bring to a boil, stirring often. The baking soda will bubble and pop, so be sure to cover the burners not being used for quick clean up (Okay, this is a messy step). Roll the dough into the desired shape, pretzel twist or bun, then boil the dough in water for ONLY 30 seconds. Remove to a baking sheet lined with parchment paper. Do this in small batches.

When you're done boiling the buns, brush them with the egg/water mixture. Sprinkle with sea salt. Bake for 15-18 minutes, or until golden brown. The buns will start to look burnt, but they're not. The baking soda gives them their deep brown color and it gives pretzels their noticeable crust. Rest and let cool for 5 minutes before serving.

Variations:

Pizza Pretzel Buns:

When making the buns, add a small cube of cheese and a slice of ham or pepperoni to the center of the dough and wrap the dough around the contents thoroughly. Pinch it closed.

Freezing:

The buns can be frozen and quickly reheated in an oven. Cover the buns in foil (2-4 in a foil package, depending on your eating habits), then place in a ziploc bag. Label the bag with the date of baking. They will stay fresh for 2-3 months.

To reheat, unwrap the buns and place on a baking sheet. Preheat the oven to 425F (220C) and bake for about 5-8 minutes, until heated through. They taste fresh baked!

Monday, March 9, 2015

Handspun to Necklace: Making the Handspun

For this tutorial, any handspun will do. You can even use your first yarn for this project, especially if it isn't strong enough to make usable fabric. Just be sure that you're comfortable wearing the yarn around your neck. If you want to know a bit more about my starting fibers, you can find out over in my other post. Something I love about this tutorial is that it's easy to turn any yarn into a finished item, and they make excellent gifts (even for 'just because' reasons!).

I will be using three different kinds of handspun for this project, just to show you how easy it is to make a quick statement necklace. I will do a video tutorial to show you the steps as well. Here is a closeup of the original yarn I made for the tutorial (the same yarn from the video):


I was testing out my new (at the time) drum carder by taking three colors and blending them together in various ways to see how the fiber looked. I also blended in extras, like silk, firestar, and angora, to see how it looked in the various blends. As a result, I had about 20-25 mini blended rovings, each weighing about 4-5g. I kept it tucked away and clearly labeled for some future use. It was a great teaching tool for me so I could get acquainted with my new carder, but it wasn't being used for anything. When I came home for the holidays, I dragged it out of my storage unit and set it next to the wheel to be spun.

I liked how the yarn looked, but I wanted to give it more durability. I ended up plying my thick-and-thin single with a thick, black, cotton crochet thread. Since my single was already lightly spun, I didn't need to do anything to my plying thread before I plied the handspun and crochet cotton together. The yarn hung balanced after setting.


The second handspun I will be using is from the Raven colorway (now sold out). I just did a basic thick-and-thin yarn, reminiscent of the yarns that beginners make. I really didn't pay much attention to the size changes; I just let the yarn happen as it would. Since I wanted to keep this a single, I made sure it was 'soft-plied'--meaning, there is just enough twist to keep the yarn together (and when I pull on it, it doesn't begin to draft apart), but not so much that it feels hard or kinks up on itself.


For the last one, I decided I wanted to try a new art yarn spinning technique. I've been wanting to use the auto-wrapping technique to get some visual interest on the surface of the yarn. The auto-wrapping occurs by letting a plying yarn loosely wrap itself around the yarn which is being made. Usually, it sits at the orifice and does its own thing. For this experiment, I attached a metallic sewing thread to the leader and placed the bobbin on my lazy kate (which fit amazingly well!). While I spun the A Cloudy Day batt, the metallic thread wound itself around the fresh handspun, lying almost perpendicular to the yarn being made. Here's the setup I used:


I'm actually not sure why this turned out so dark, but I hope you can see that it's sitting on my lazy kate. :)


And here is the yarn as it's being made with the auto-wrapping technique:


Its almost like the auto-wrapping bundles up the fluffy bits of the fiber. It's a very cool effect, and one I will use again in the future. I had some trouble adjusting the uptake. It wasn't fast enough to prevent me from overspinning the yarn, but when I increased it slightly, it tugged too hard at the underspun yarn and threatened to draft it apart. So, more practice is in store for me.


I think this also might be a really great project for my coiled yarn that I made several months ago. Because your first art yarns might be a little wonky, this project might give you the right amount of motivation since there is an end goal--I know that some of you don't want to try crazy things because you have no idea what to do with the finished yarn!

Here's the finished auto-wrapped yarn:


It's slightly overspun, but I think I can work with that. Beginner handspun can be overspun, so I'll keep it that way and talk about what to do if your handspun is also overspun. Maybe it'll stay that way and offer a cool twist when we make our necklace--who knows! If martial arts and living abroad have taught me anything, rolling with whatever life gives you can make your life easier, happier, and more fulfilling. So, if you haven't spun up your yarn yet, you still have a bit more time before we start on this project together. Share your handspun with the rest of us over on Facebook if you haven't already!

Friday, March 6, 2015

Let's Wash a Merino Fleece: Step 2, Divide it Up

For this step, you are free to skip it if you do not want to separate out the prime part of the fleece from the rest of the fleece. As I already mentioned before, I always do this step because it gives me options for how I will use a fleece. If you have an extremely consistent fleece, you may want to skip this step.

What do I mean by "prime"? The prime part of the fleece is the best part of the fleece on the animal. For most sheep, this is the wool on the sides of the animal, not including the middle strip down the back of the animal, the leg wool, britch wool, or belly wool. In some breeds, the wool around the face, neck, and shoulders is the softest wool, and should therefore be considered prime wool as well. The "seconds" can mean one of two things (from my experience): 1) anything not prime wool but still usable; or 2) the small, short cuts of wool resulting from the shearing process and often thrown away. Since the "seconds" of the second meaning are usually thrown away before you get the fleece--via a process called "skirting"--I will refer to the first meaning of "seconds" herein.

Now that your whole fleece is laid out, assess which portions you think constitute seconds. This will be a process best done by feel, since it will vary according to the consistency within the fleece you're processing. Does this part feel soft enough? If so, consider it prime. You should really take some time to get acquainted with your fleece so you don't miscategorize the parts of the fleece.

To begin pulling the seconds away from the prime, grab the tip of a lock and slowly pull it away from the prime so the lock stays intact. Do this for every lock until the seconds and prime are fully separated. Go slow. Do this on a day when you have a couple of hours to work uninterrupted. Try to keep the prime in one full piece. I don't mind if I break the seconds into smaller pieces.


Do you see those tips? Pull the whole lock from the adjacent lock to prevent stray fibers from loosening and making the lock jumbled. Use two hands and a gentle touch. Trust me, this small detail is worth it!


As you can see, the slightly cotted locks made it into the seconds box. I'm not too worried about rolling up the seconds like I do the prime, just be sure they're in neat little piles so you don't mess up the lock structure. Remember, seconds are still really good bits of the fleece, just not the cream of the crop!

Here, we have the whole prime part of the fleece sitting on the floor. It's amazing, isn't it? I checked the strip down the center of the back and it was clean and just as soft as the prime part of the fleece, so I kept that part with the prime. The prime fleece is actually quite large by comparison. That's a slightly skewed result since I didn't work on the whole fleece straight from the animal. If I were to venture a guess, the seconds constituted 25% (about 2 pounds) of the fleece I bought, and the prime was about 75% (about 5.5 pounds). 

 
At this stage, we can roll up the prime fleece and start washing the seconds. If I have the opportunity to work with a whole fleece, I like to use the seconds as the proverbial guinea pigs. (Not really, since I love guinea pigs and would never hurt them.) If you are unsure and inexperienced with washing this type of fleece, or fleeces in general, this will help you prevent ruining an entire fleece. I've heard enough sad stories about ruined fleeces (okay, not entirely ruined, since you can spin semi-felted wool to make really cool art yarn!), so I will emphasize this step in the process. But that will be for the next post!

Post your questions/comments below, and if you have your own way of processing fleeces, post your tips there too! Thanks for reading everyone. :)